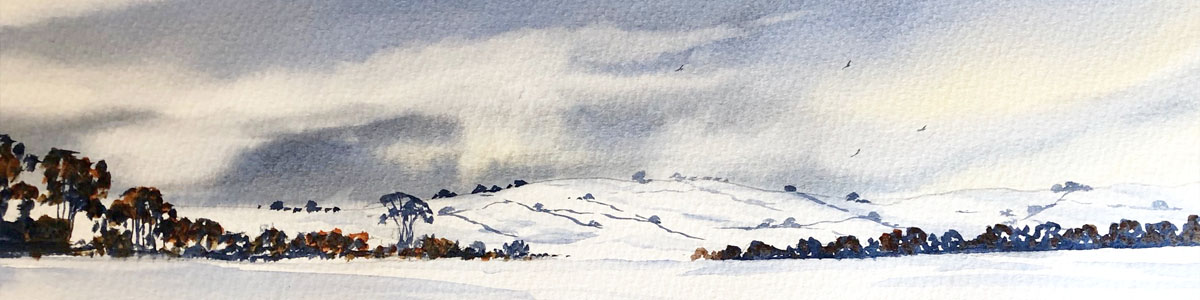
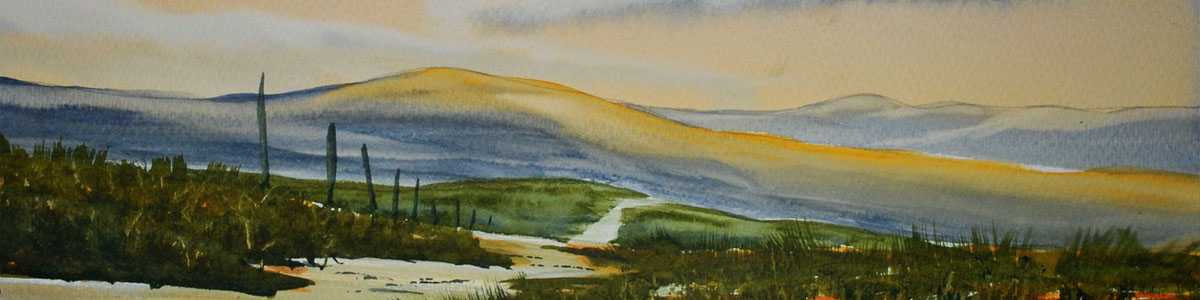
After the usual straight forward outline drawing I’ve put on a fairly straight forward sky wash, by starting off by pre wetting my sky area with water, and then firstly dropping in with a little bit of yellow ochre mixed with the tiniest touch of burnt sienna and then cobalt blue from the top all the way down to my distant hills. Then using the same brush, which is a 1.5” wash brush, simply suck out a few clouds.
Step 2 :
Once my sky area has dried, straight in with the distant hills, and for these I have used mixtures. For the far distance, cobalt blue mixed with the tiniest touch of alizarin crimson, and whilst it was still wet, a few hints of yellow ochre, this is all for the furthest away hills. As I come slightly further forward I am using the same mixtures but then dropping in a little hint of hookers green. All of this was done with my ¾” flat wash brush. Notice at this point that I have left out the little buildings that I have drawn in the distance, leave them white for the time being.
Step 3 :
All I have done on top of all this for the next image is using my No. 8 round brush, with the tip of the brush, simply drop in a few blobs, lumps and bumps and a few squiggly lines using hookers green with a tiny touch of burnt sienna mixed in. At this stage I have also done my distant houses and buildings, firstly using light red for the roves, very well watered down because light red it a strong colour. And then a touch of cobalt blue mixed with alizarin crimson for one side of each building, leaving the front bits white.
Step 4 :
As I come further forward into the middle distance, the fields are all a little bit darker and of course a little bit bigger. So I have gone on with my ¾” wash brush with a very wet yellow ochre followed by hookers green and burnt sienna mixed whilst the first colour was still wet. Then again drop in with a mix of hookers green and burnt sienna, add a few lumps and bumps to signify bushes and hedge lines.
Step 5 :
Coming further forward on the left portion I have again gone in with a wash of yellow ochre all over this area, then hookers green and burnt sienna on top of it, leaving a few bits and pieces of yellow ochre showing through here and there. But notice I have left that little path squiggling away into the distance showing as just yellow ochre.
Now to the big lump over to the right hand side, there are a lot of colours gone in here, as you will imagine yellow ochre first, followed by hookers green and burnt sienna. Whilst all this is still wet, a few touches here and there of burnt sienna, I just stipple this on, followed by a little bit of stippling with stronger yellow ochre then also a little bit of cobalt blue.
Now let all this dry. In the meantime I went back over to the left hand side that I had previously painted and put a little bit of shadow to the left hand side of that lumpy bit of ground that I previously painted. The shadow mix being, cobalt blue, burnt sienna and alizarin crimson. All of this section that I have just mentioned was done with my ¾” wash brush. The little bit of grass under the tree was painted with hookers green and yellow ochre, for a lighter brighter green.
Step 6 :
For Hadrian’s Wall itself I have blocked the whole thing in using the Charles Evans Sand colour. I have let you see it before and after, the bit in the foreground is still just the sand. As it curls off further away you will see that I have added with my No 8 round brush a few stokes here and there of yellow ochre followed by raw umber, followed by light red, just to signify a few stones in the wall. Remember, when doing something like this, your painting it, not building it, so don’t paint a million stones in it, give the impression rather than the detail. Then I have stroked over with a little bit of my shadow mix again, which again is cobalt blue, burnt sienna and alizarin crimson.
Step 7 :
As you will see now I have finished off the rest of the wall in the same way but slightly bigger.
Step 8 :
You will see here I have got the tree just blocked in. For the tree trunk using my No 8 round, yellow ochre to the right, raw umber to the left, and then cobalt blue and burnt sienna mixed (very dark) to the extreme left, this is all done whilst still wet so that the colours run into each other.
For the top part of the tree, the foliage, using my No 8 round I have just blocked it in with hookers green and burnt sienna. Now it looks quite flat but……
Step 9 :
in the next image, once it has dried, using my ¾” wash brush I have stippled on mainly to the left hand side, cobalt blue, then to the right hand side, yellow ochre fairly strong. Now this gives the whole thing more life.
Finally add a little bit of shadow underneath the tree.
Step 10 :
For the big bit in the foreground I have washed the whole area with yellow ochre then whilst it was still slightly damp, re wash on top using hookers green and burnt sienna but again leaving bits of yellow ochre showing through here the there. Also leaving the path area just yellow ochre. Once this had dried I stippled on still with my ¾” wash brush with a little bit of burnt sienna here and there, yellow ochre stronger here and there, then a few hints of blue stippled here and there.
Once the path had dried I used my No 8 round brush to give the impression of a few stones using raw umber and a few touches of light red. Then I put a few hints of my shadow colour to the right hand side of the path and there we have it, another glorious scene from the beautiful Northumberland.